
eSewa is Nepal’s number-one digital wallet and payment gateway app. With over 5 million satisfied users across the country, eSewa has become an indispensable part of everyday life. This super convenient app allows you to pay bills, book tickets, shop online, send/receive money, and much more, right from your smartphone.
However, to unlock the complete potential of eSewa, you need to create an account and complete a one-time verification process. This guide will provide step-by-step instructions on how to easily create and verify your eSewa account. So let’s begin!
Creating eSewa Account
Creating an eSewa account is quick and straightforward. Just follow these steps:

Step 1: Install the eSewa App
Go to the Google Play Store if you are using an Android phone or the Apple App Store if you are using an iPhone. Search for “eSewa”. Download and install the official app from eSewa Payment Solutions. This is free.
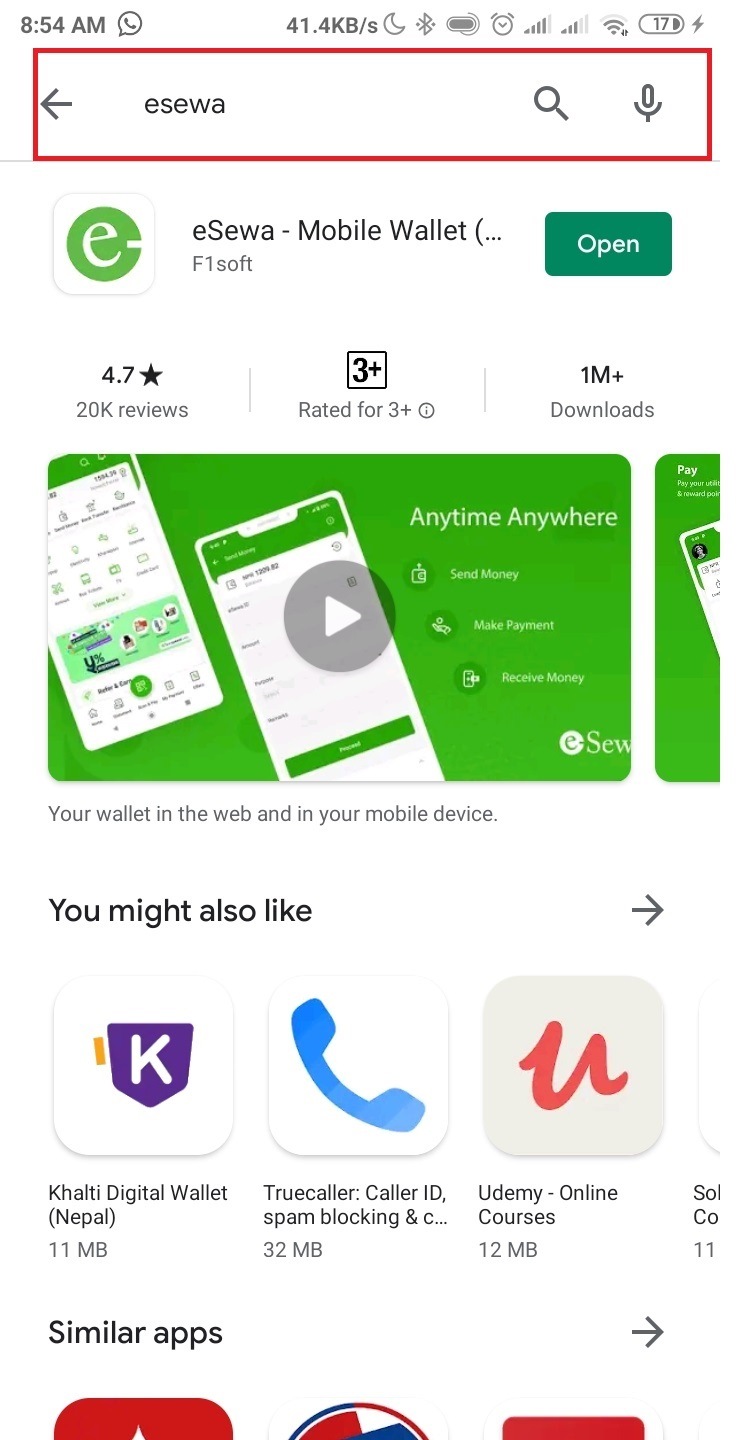
Figure 1: Search for the eSewa app on the App Store or Play Store to install
Step 2: Register a New Account
Open the eSewa app on your phone. On the bottom, tap on “Login/Register”. This will open the account creation page.
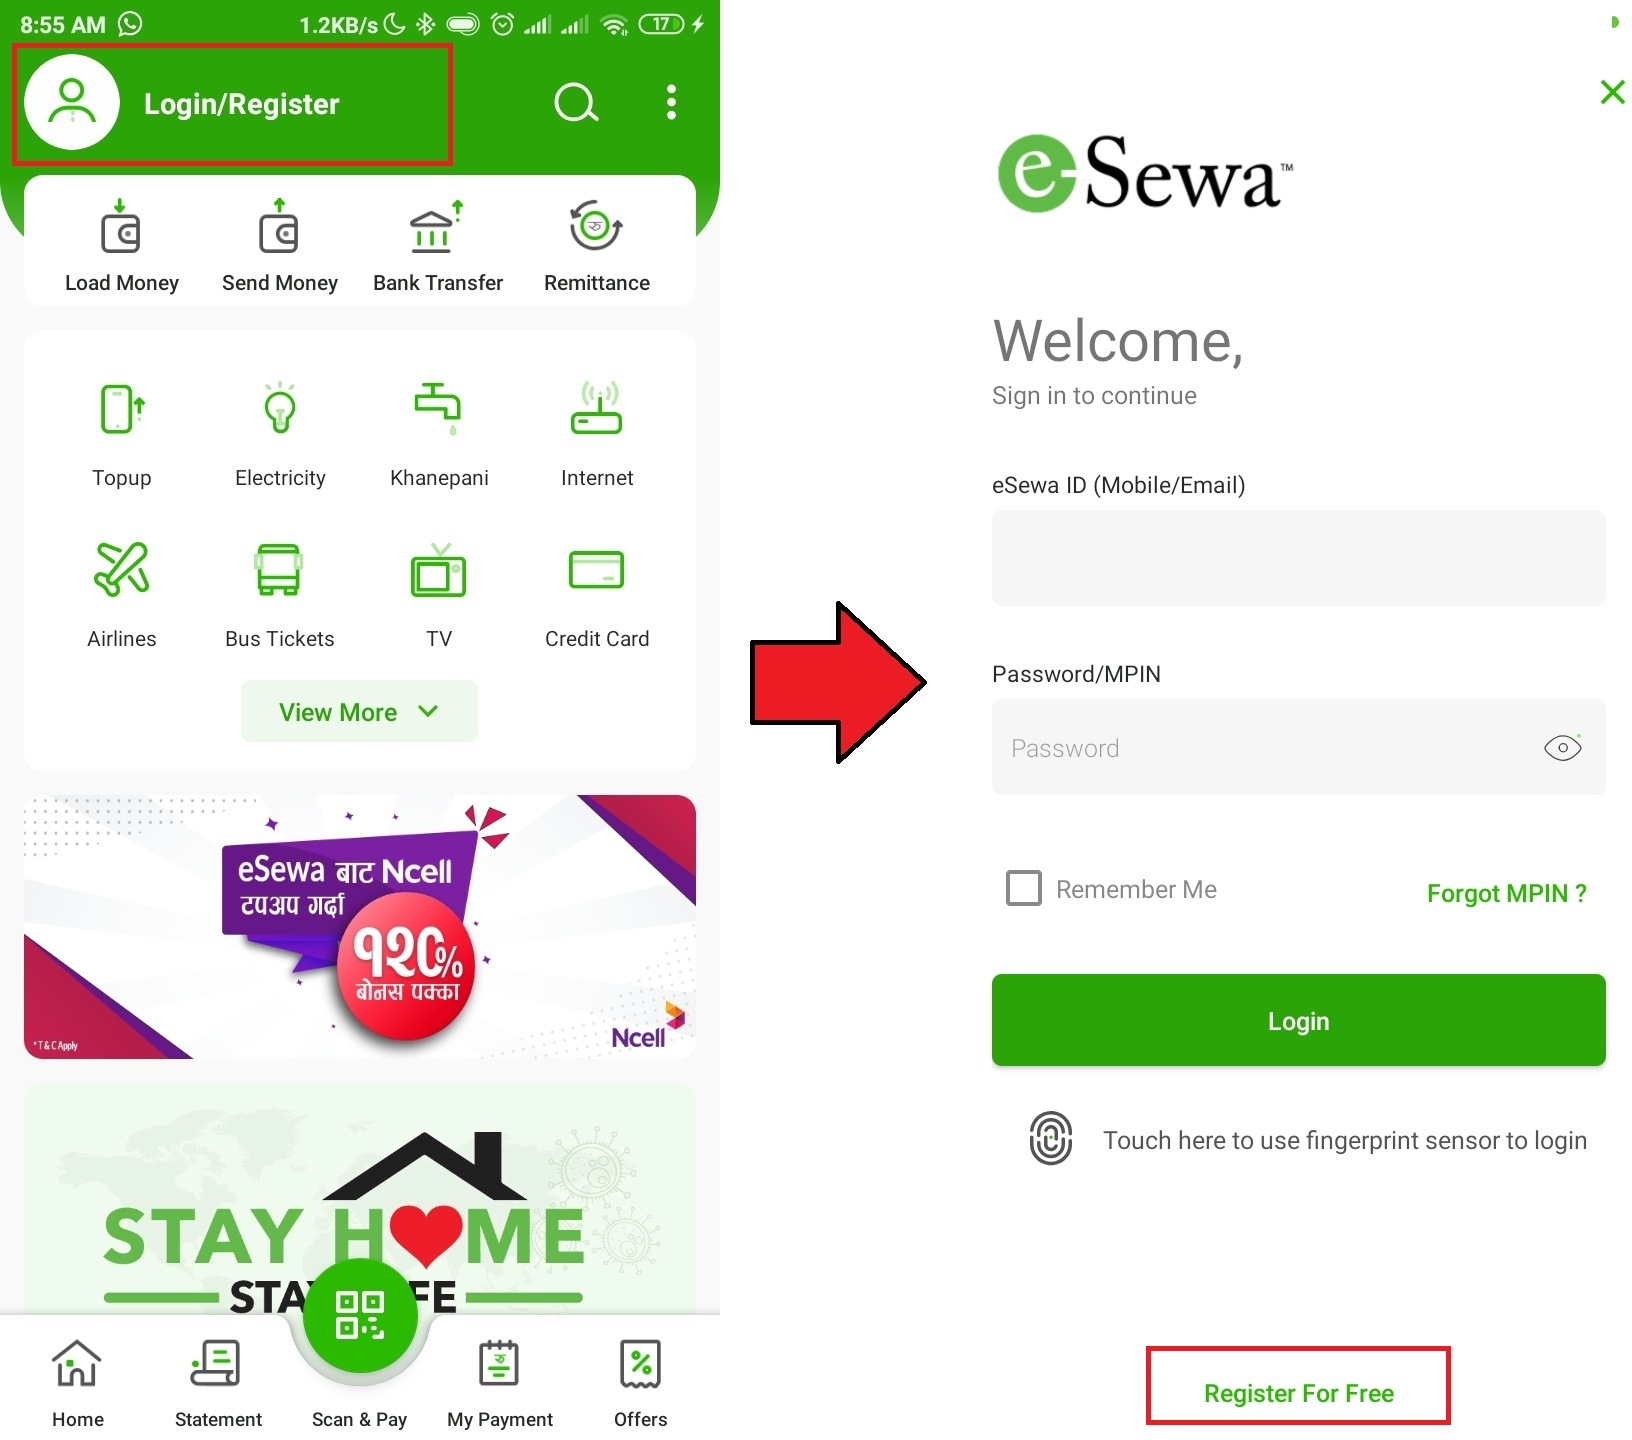
Figure 2: Tap on Login/Register to create new eSewa account
Now select “Register for Free” option to initiate signup process.
Figure 3: Select Register for Free option
Step 3: Enter Mobile Number
You will need an active Nepali mobile number to register eSewa account. Enter your working 10-digit mobile number and tap “Proceed”.
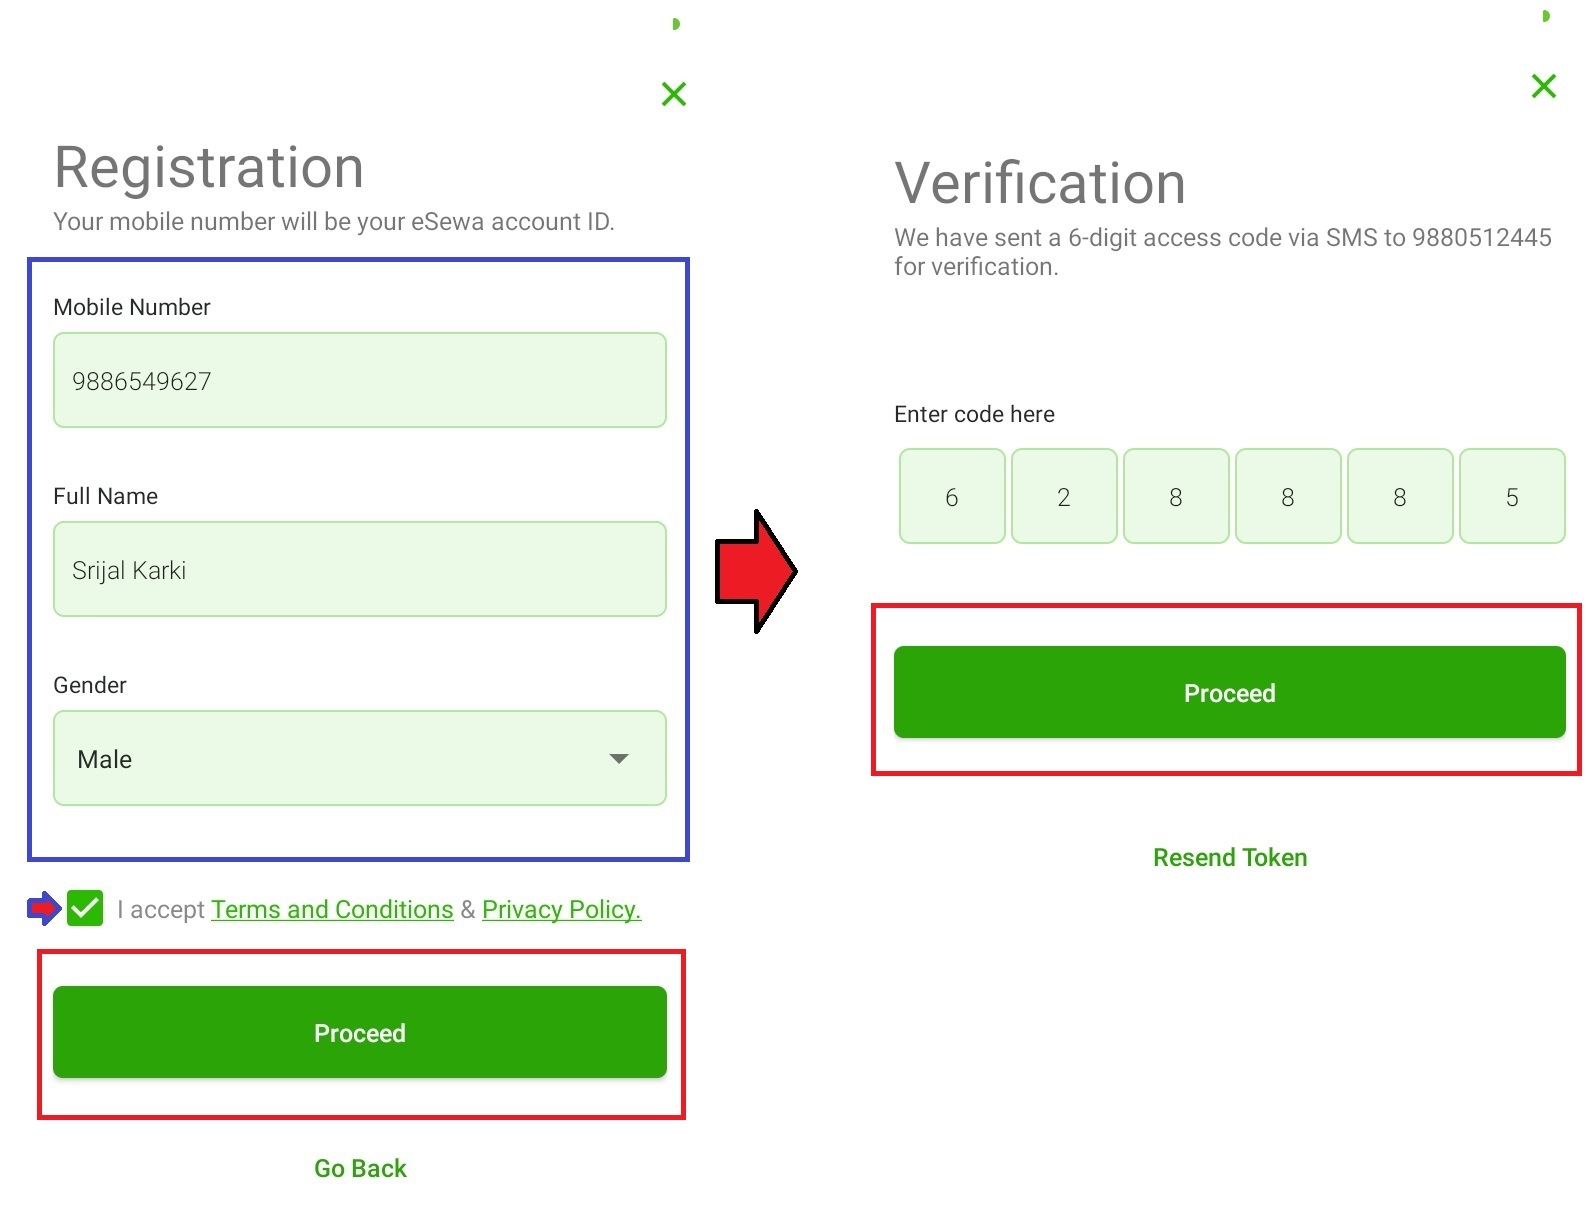
Figure 4: Enter active Nepali mobile number
Step 4: Verify OTP
An OTP (One Time Password) will be sent to your mobile number automatically. Enter this 4-6 digit OTP correctly and tap “Verify”. This verifies ownership of your number.
Figure 5: Verify mobile number through OTP sent via SMS
Step 5: Set MPIN
You now need to set a unique 4-digit MPIN number. This MPIN will be used for all future logins instead of OTP. Memorize or save this number securely.
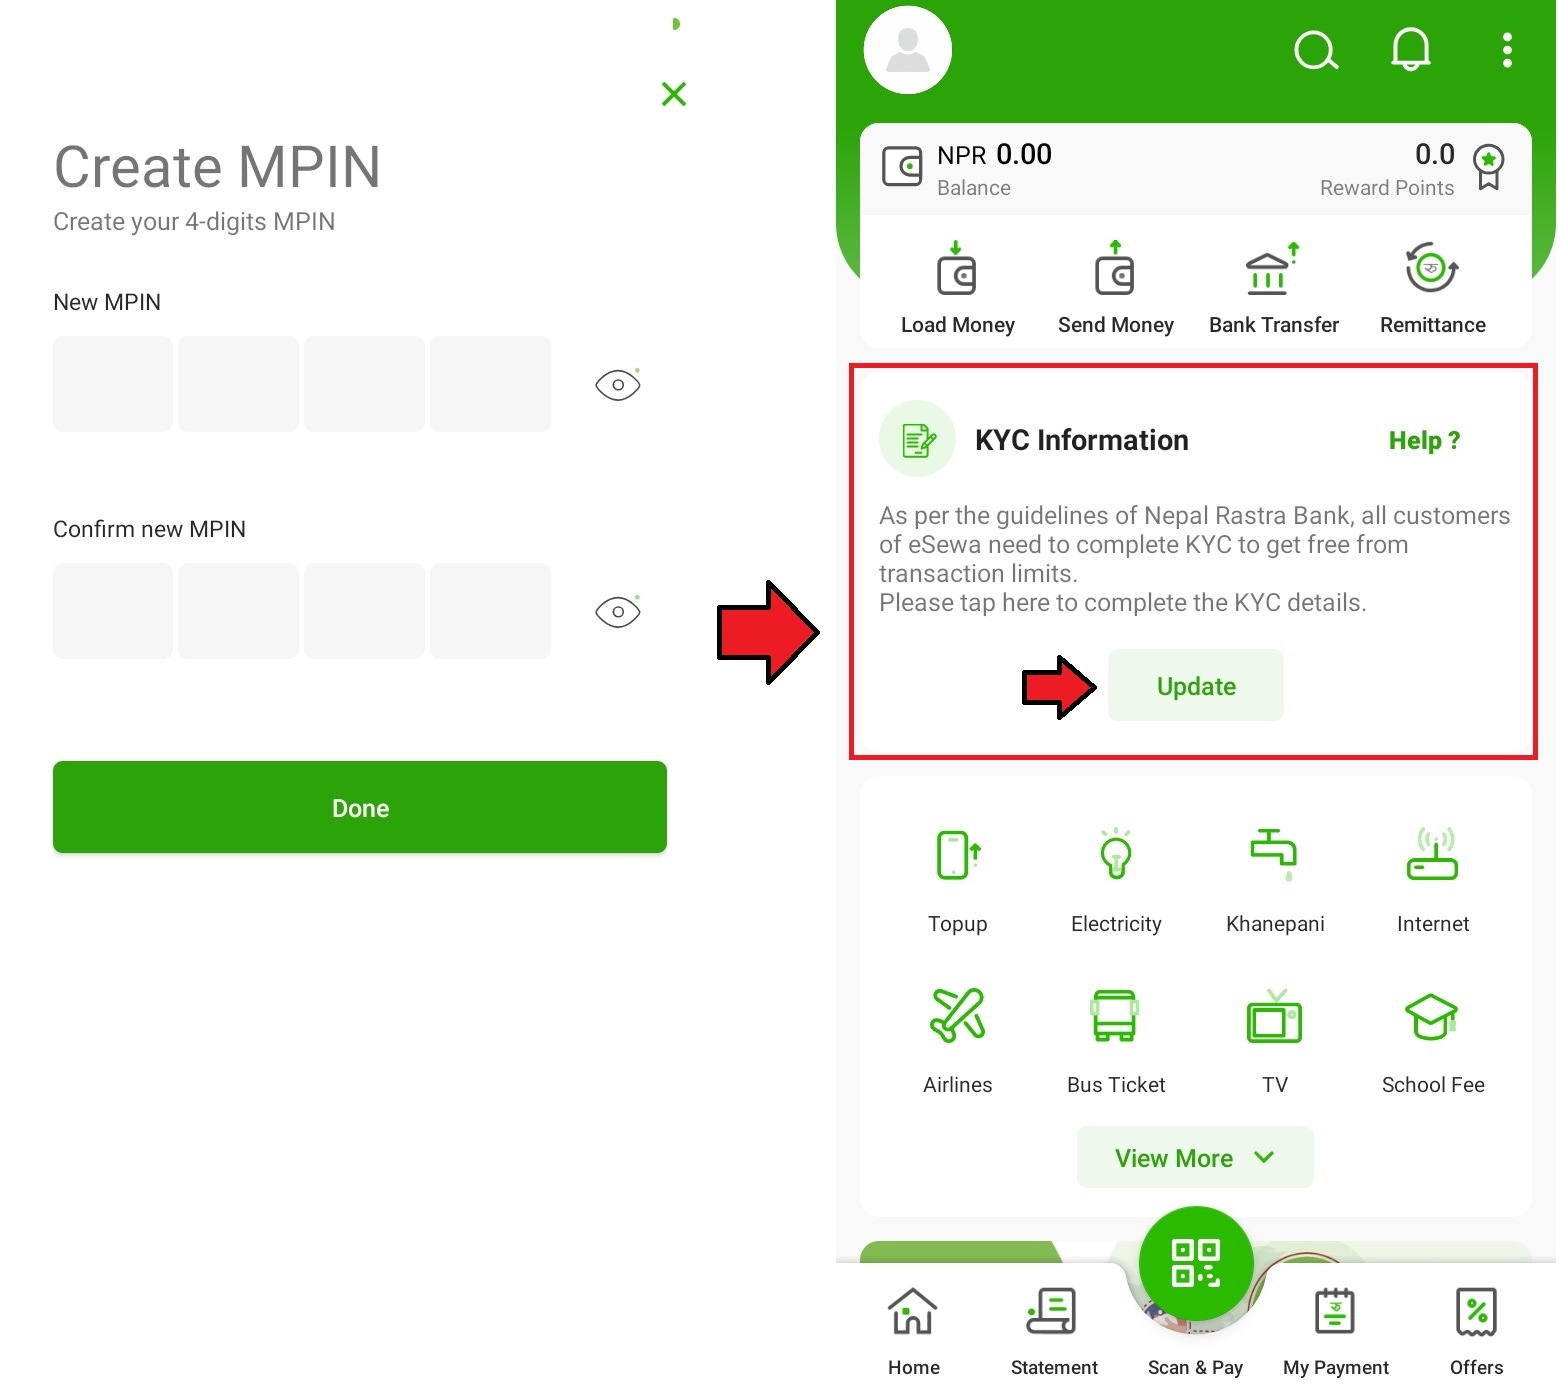
Figure 6: Create a unique 4-digit MPIN
Step 6: Fill in Personal Details
Enter your full name, select gender and provide other basic personal details correctly.
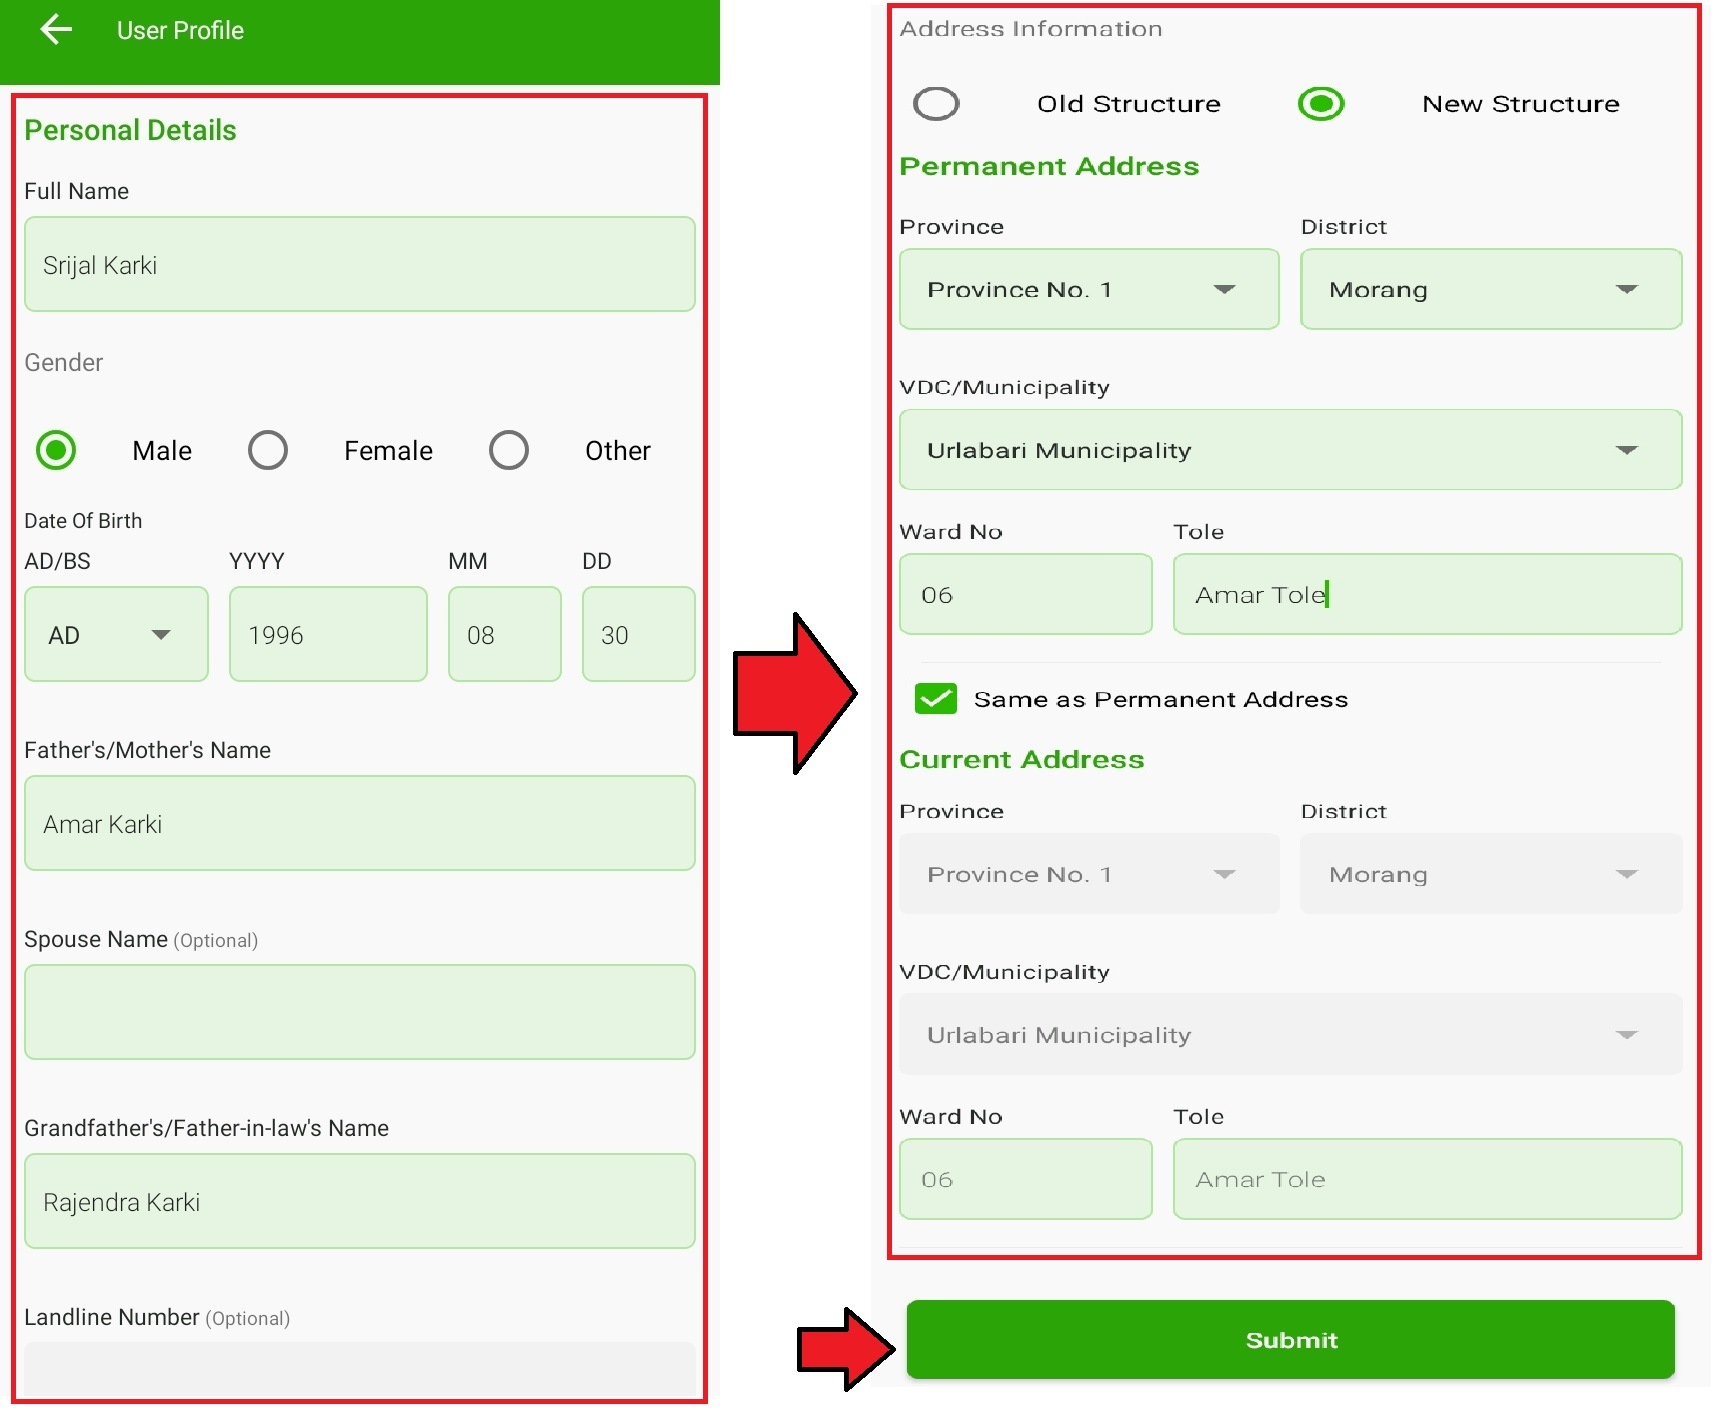
Figure 7: Submit name, gender and other info
Finally, accept the Terms of Service and Privacy Policy to complete the initial eSewa registration.
That’s it! Your eSewa account is now active. But there are lots of limitations at this stage. Read on to learn how to verify accounts and remove restrictions.
Verifying eSewa Account
While your account is now functional, you won’t be able to enjoy complete features until verification is completed. Here are key restrictions:
- Daily transaction limit capped at Rs. 5,000
- Cannot move money from eSewa wallet to bank
- Cannot receive international remittance into eSewa account
To lift these limits and unlock full potential of services, you must complete a one-time eSewa KYC verification.
Step 1: Initiate KYC
Tap on the profile icon on top-right corner and select “My Information” option from the menu.
Figure 8: Go to My Information section
Under ‘Account Verification Progress’, tap on “Update”. This will initiate KYC verification process.
Figure 9: Tap Update to start verification
Alternatively, you can also start verification directly from home screen by tapping the “Complete Your KYC” banner.
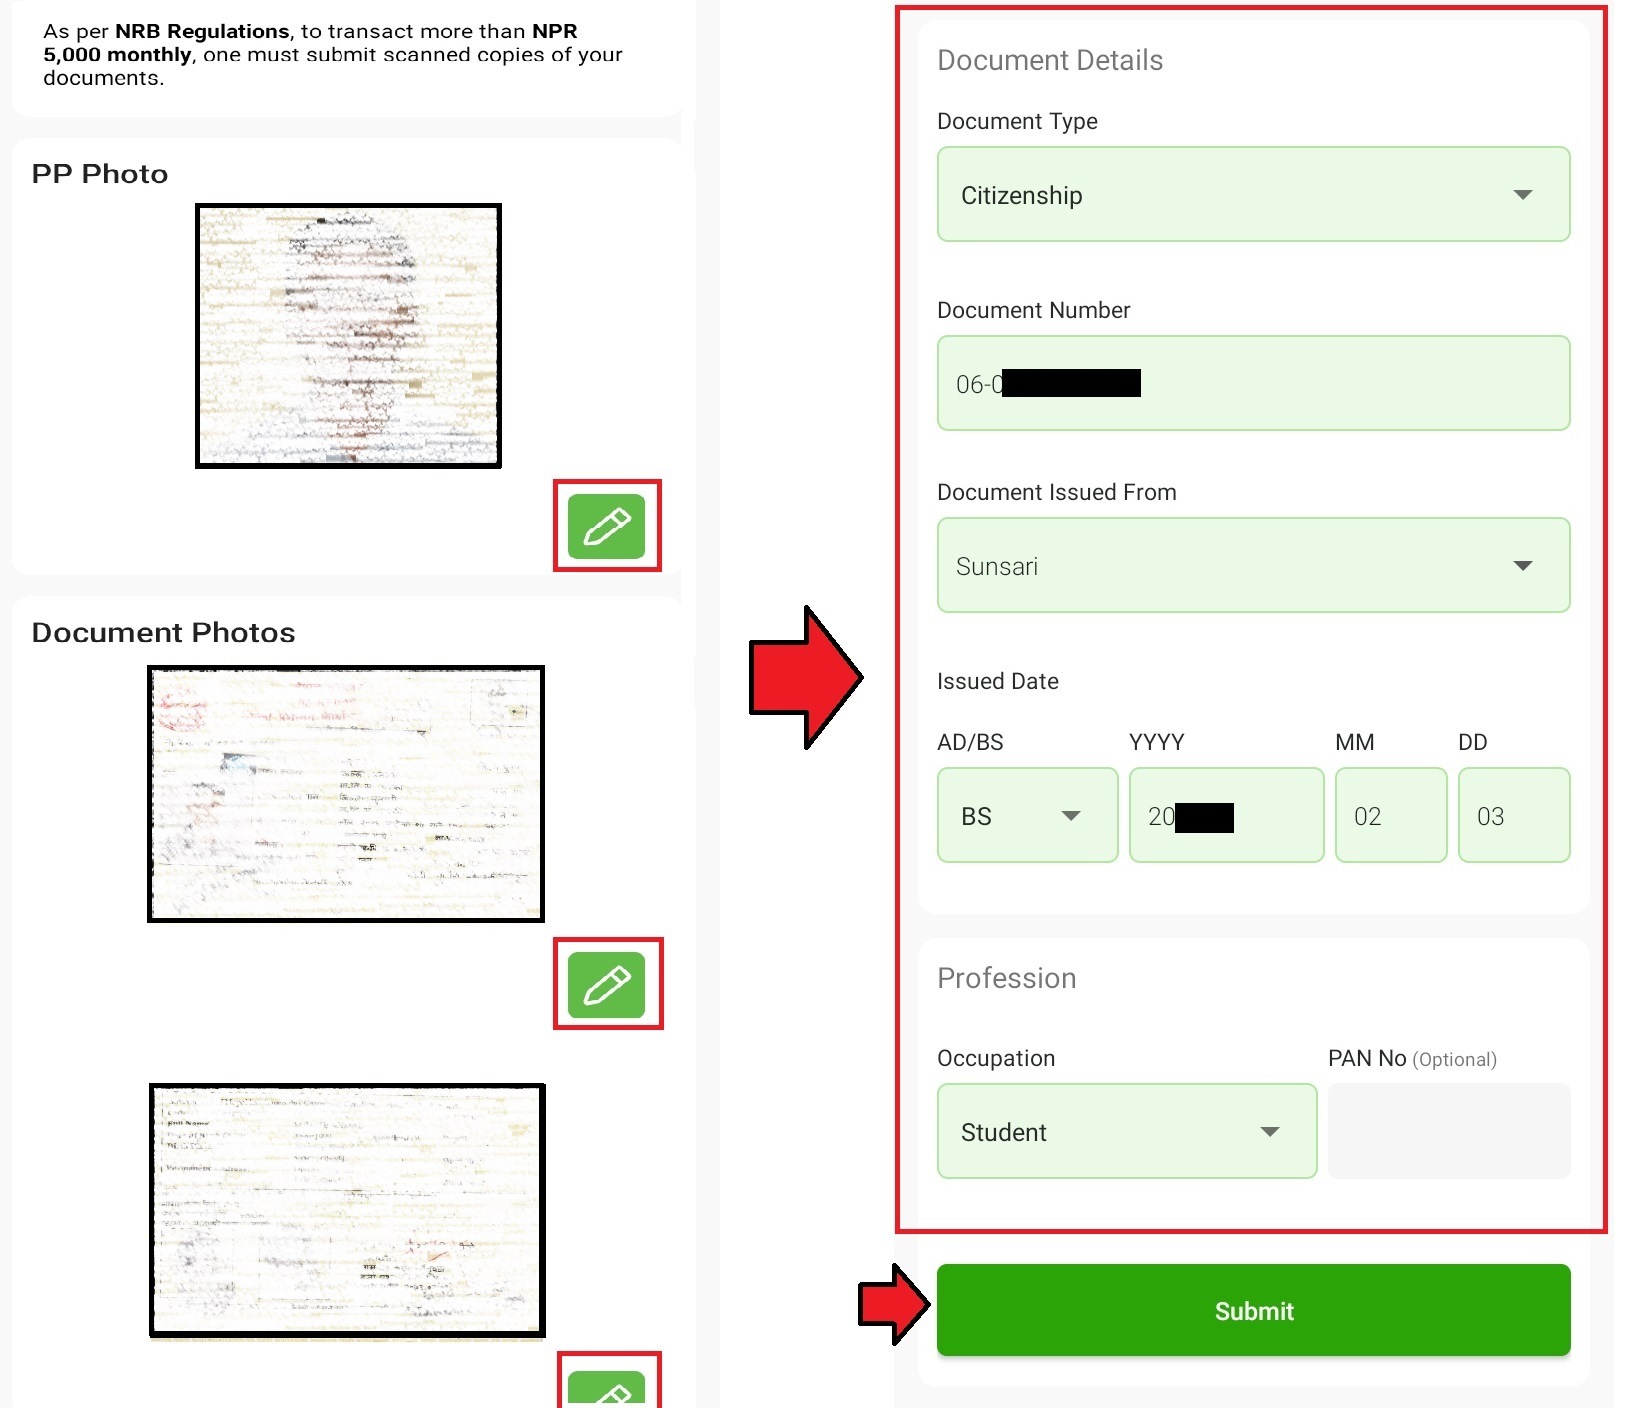
Figure 10: Directly initate KYC process from eSewa home screen
Step 2: Enter Personal Details
You will now see various input fields to enter required personal details accurately.
2.1) Basic Details
Start by entering your full legal name, father’s name and grandfather’s name correctly as per your citizenship or other ID document.
Next, input your date of birth, mobile number, occupation and current & permanent addresses.
- All names and dates should match exactly with your ID documents
- Enter address details completely with district, ward no. etc.
- Occupation should match with ID document
2.2) ID Document Details
Now enter the document info that you will submit for verification.
Select document type:
- Citizenship Certificate
- Passport
- Driving License
- Other eligible Nepali ID
Next, enter:
- Document number
- Issue date
- Expiry date (if applicable)
Make sure all details match your document.
2.3) Upload Photo and Documents
You need to upload:
- A clear passport-size photograph as per guidelines
- Both front and back side scans/photos of your ID document
The files must be in JPG/PNG format, under 200 KB size and with a minimum dimension of 600×600 pixels. Blurry or incomplete documents will be rejected.
Figure 11: Upload clear photo and ID proof for verification
That completes required information. Now tap “Submit Verification Request”.
Step 3: Pay KYC Fee
A nominal KYC verification fee is chargeable. You can pay this directly from your eSewa wallet. KYC charge is usually Rs. 25.
Select your preferred payment method, enter eSewa MPIN and pay the fee.
Figure 12: Pay a small KYC verification fee
Step 4: Track Status
Once your documents are submitted, KYC verification will be completed within 48 hours.
You can check the current status anytime in the “My Information” section.
Initially, the status will show as “In Review.”.
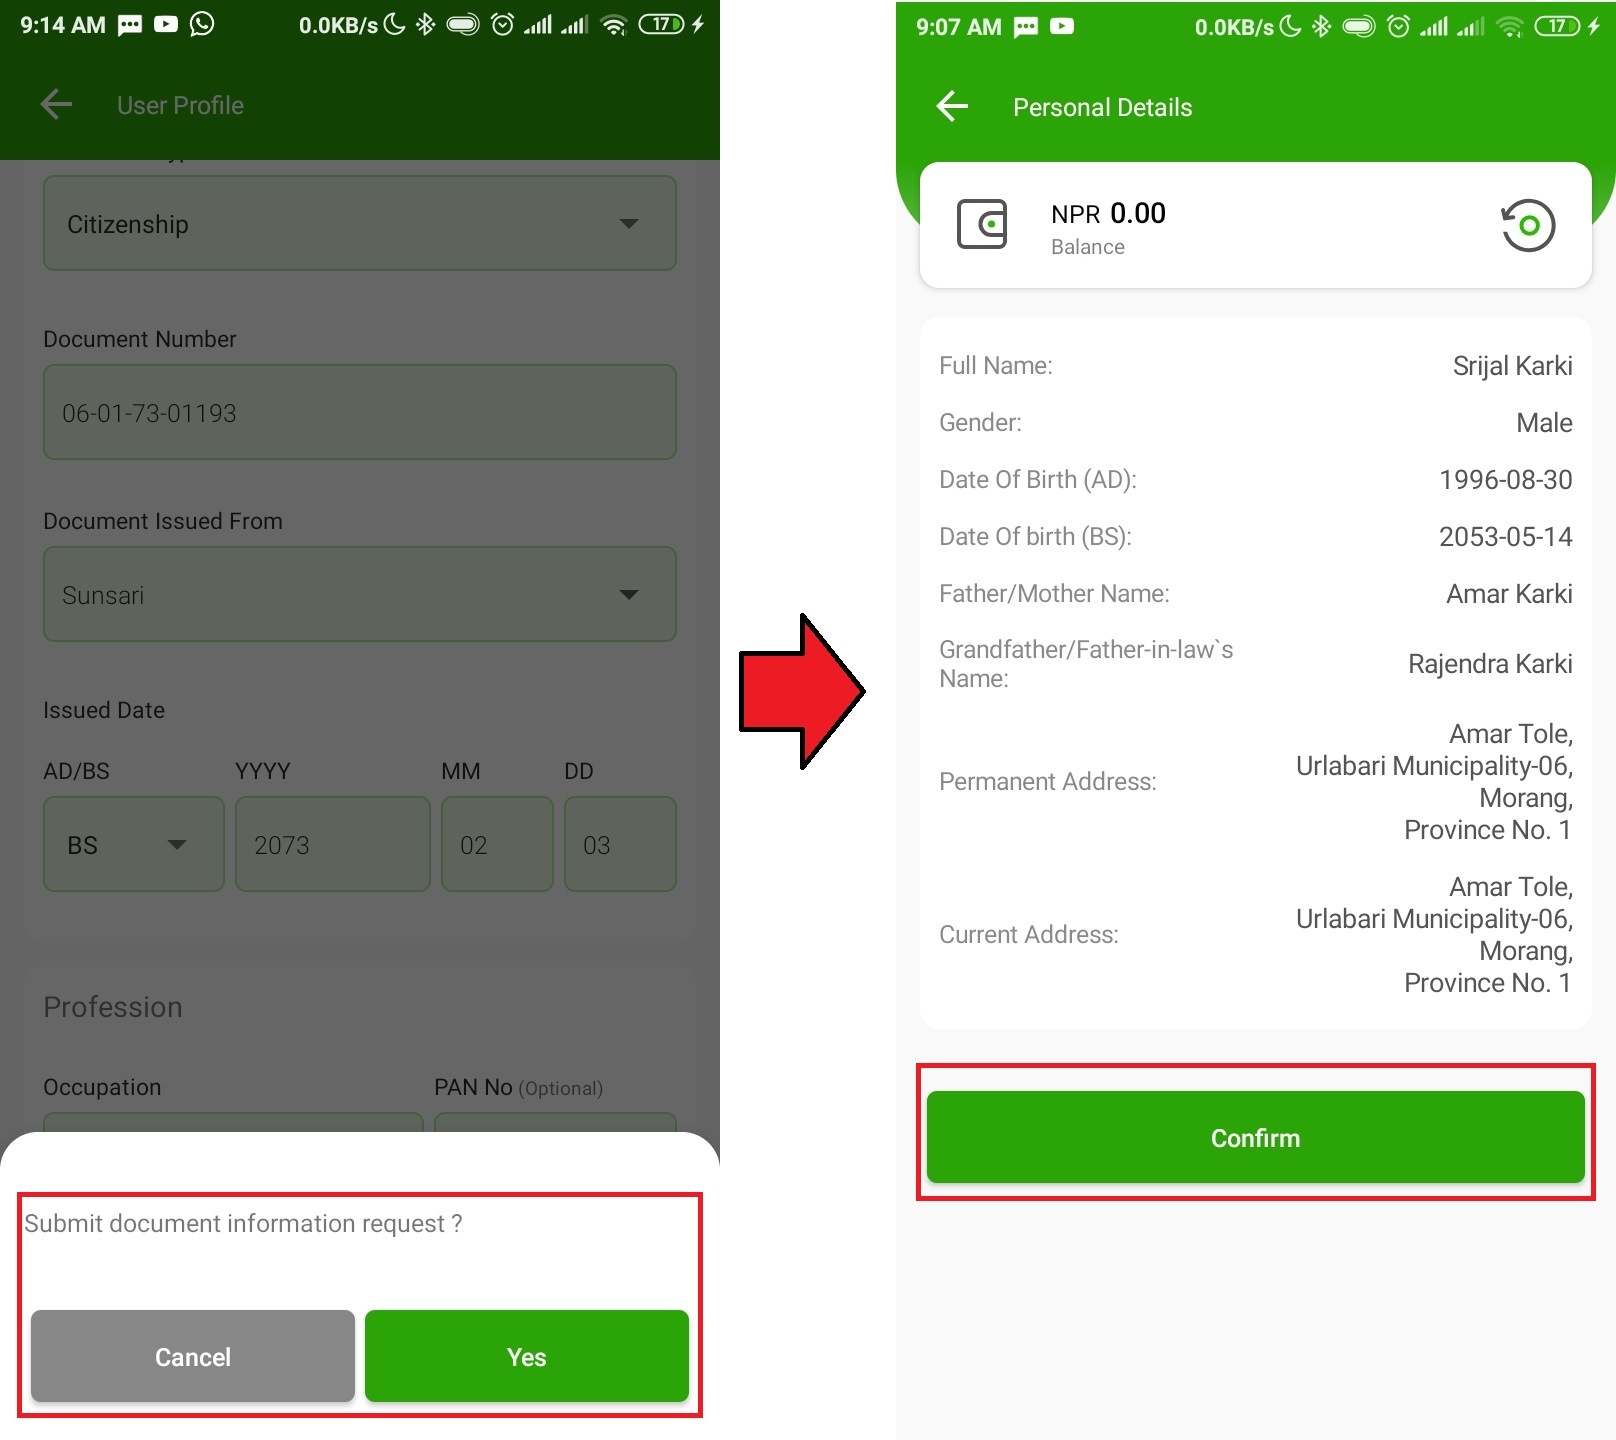
Figure 13: KYC status – In review
This means your documents are under the verification process.
If any issue is found, the status may change to “Returned” and you will have to re-submit the correct documents.
Otherwise, upon successful validation, the status will show “Verified,” and you will also receive confirmation via SMS and email.
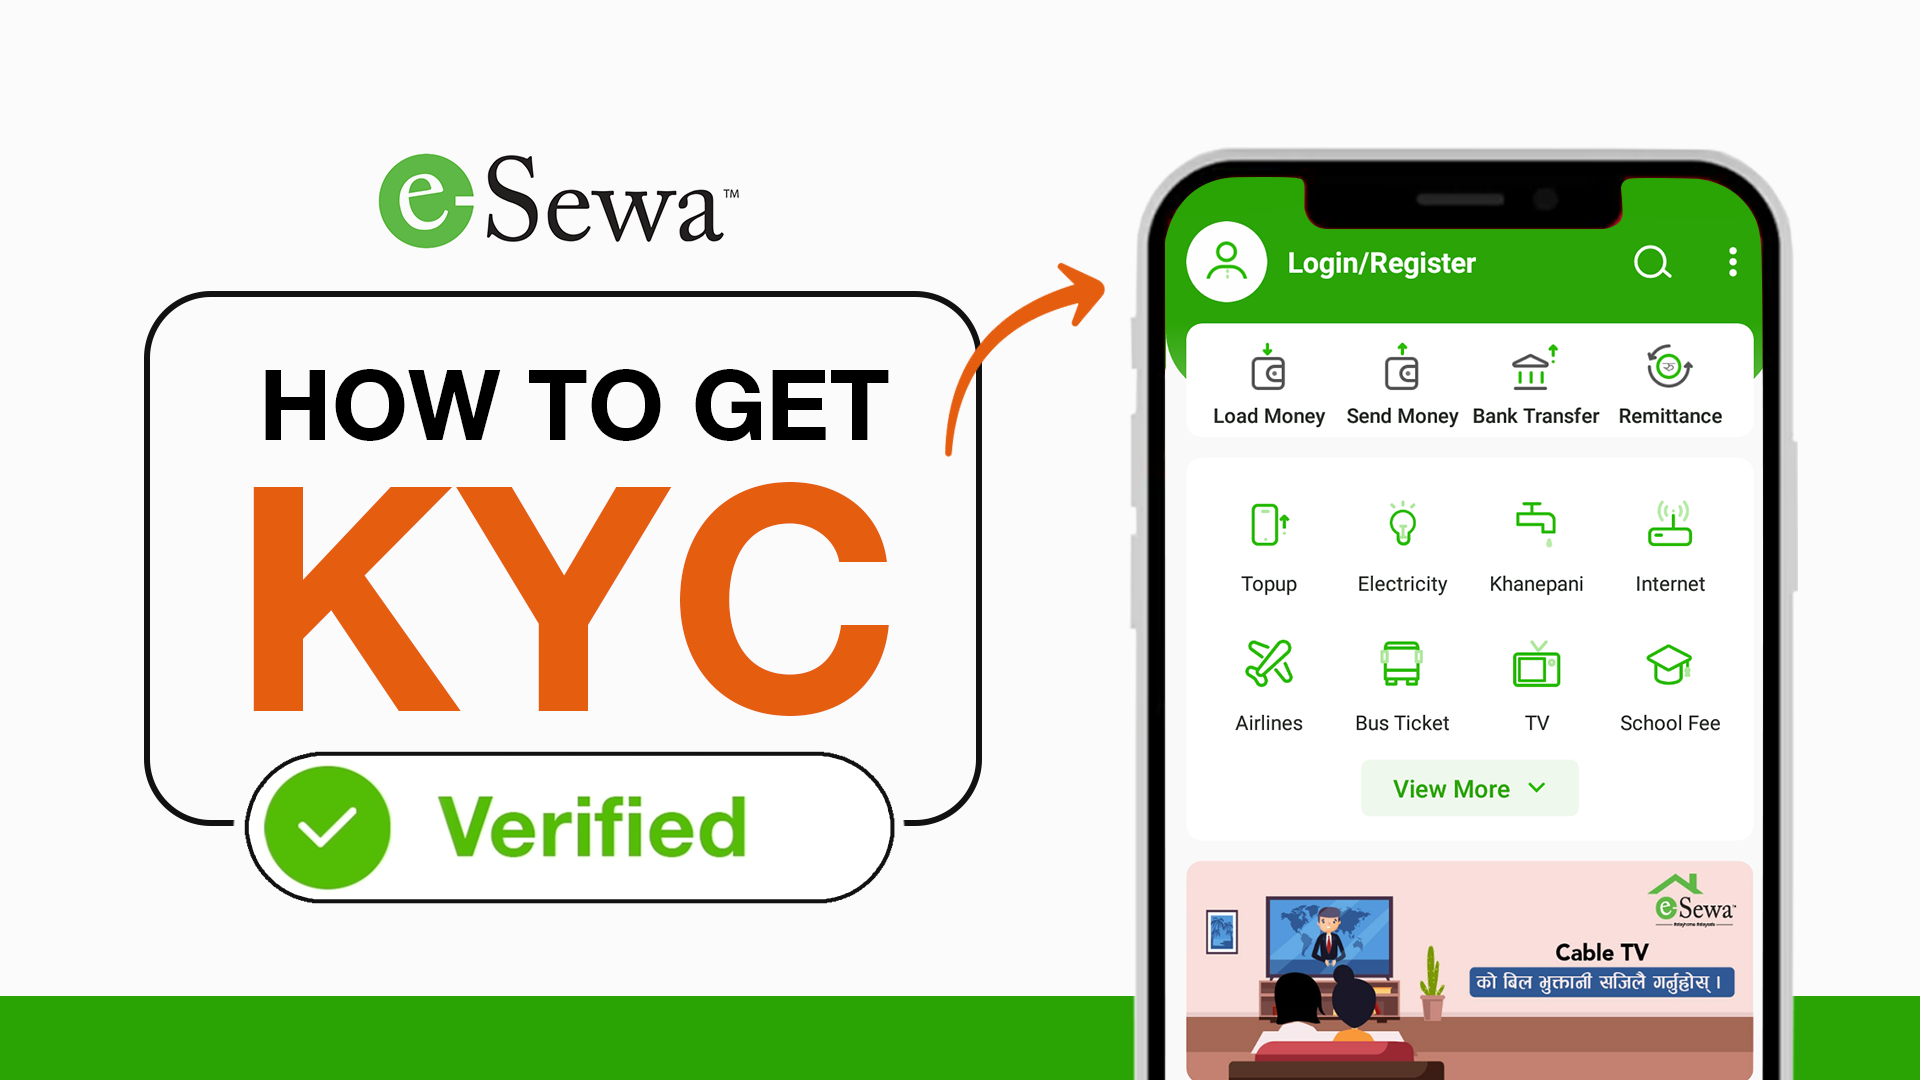
Figure 14: KYC status – Verified
So that completes eSewa account creation and verification in easy step-by-step process.
Benefits of Verification
Once your eSewa KYC is completed, you unlock full scope of services without annoying restrictions.
1. Higher Limit
Daily eSewa transaction limit shoots up from Rs. 5,000 to whopping 1 lakh per day post-verification!
You can pay higher value bills, book multiple tickets, transfer bigger amount – no worries.
2. Bank Transfer
Now you can seamlessly transfer or cash out money from your eSewa wallet to bank account anytime.
Over 30 partnered member banks support instant eSewa withdrawals at bare minimum fees.
3. Receive Remittance
Overseas family and friends can directly send you money into eSewa account using services like Western Union, Moneygram etc. This brings huge convenience.
Plus enjoy uninterrupted payments, ticketing, recharges and other services once your account is KYC approved.
So those were key benefits that verification unlocks for maximum utilization.
Important Do’s and Don’ts
Here are some important points to remember during the eSewa KYC process:
DO’S
- Enter every detail accurately as per ID documents
- Recheck all information before submission
- Upload clear documents meeting guidelines
- Contact Support if an application gets stuck
DON’TS
- Don’t submit fake or edited documents
- Don’t enter made up information just to pass verification
- Don’t click photos of ID with glare or blur
- Don’t crop document scans to hide details
Submitting false KYC information is illegal and will lead to a terminated account plus penalties. So be honest!
Troubleshooting Tips
Despite the smooth process, here are some solutions for common eSewa account verification issues faced:
Problem 1: KYC application stuck on submitted status for long
- This usually indicates missing or incorrect documents. Wait for an email/sms clarifying the exact problem.
- Re-check all input info and document quality. Make corrections and attempt re-submission.
Problem 2: Photo verification failed error
- Ensure the portrait image is as per dimensions/size/white-background guidelines
- Body/face should occupy 70-80% area without distractions
- Retake the photo if you have spectacles, caps or unclear facial features
Problem 3: Documents not readable error
- Upload color scans or high-quality photographs of the ID document
- Zoom in if the text or details are too small to read
- Enable flash and avoid shadows if clicking pics through the phone camera
- Maintain aspect ratio while resizing images
Problem 4: Details mismatch error
- Corrections are needed if manually entered info does not match scanned documents
- Verify there are no typos or spelling errors before re-submitting
Problem 5: Unable to upload documents
- The slow internet connection can interrupt the upload
- Optimize large files to reduce size below 200 KB
- Try uploading over WiFi or a cellular data network
- Restart device and app to fix software glitches
So those were the most common verification issues and their solutions. Follow the guidelines and you will breeze through the process without any major hiccups.
Renewing eSewa KYC
Your account will remain permanently verified until your ID document itself expires.
However, you may need to renew your KYC under the following circumstances:
- ID used during previous verification has expired
- Eg. Citizenship, Passport etc.
- Major profile details changed
- Name change after marriage
- Changed mobile number, address etc.
Renewal process remains the same:
- Initiate through My Information > Update option
- Enter the latest details accurately
- Upload new valid ID proof
- Make payment and submit a request
Renew KYC seamlessly before ID expiration to enjoy uninterrupted eSewa services!
Conclusion
That concludes this detailed guide on creating and verifying your own eSewa digital wallet account. Follow all the instructions carefully and complete the quick one-time eKYC process to unlock the complete scope of services eSewa offers.
You can now pay bills, recharge phones, book flight/bus tickets, send/receive payments and do so much more instantly from this single app, no matter where you are in Nepal. Everything is just a few taps away on your phone screen.
As more and more physical stores, third-party apps and commercial websites integrate with eSewa payment gateway, the platform becomes highly indispensable.
So get started today and become part of Nepal’s digital payment revolution that promises convenience, security and reliability. Experience eSewa at its finest!
FAQs
Here are the Top 5 most searchable FAQs about creating and verifying eSewa account with answers:
-
How do I create an eSewa account?
Download the eSewa app, enter your mobile number, verify with OTP, create MPIN, fill in personal details and register your account. -
Why should I verify my eSewa account?
Verification lifts transaction limits, and allows bank transfers from eSewa wallet and receiving foreign remittances into eSewa account. -
What documents do I need for eSewa verification?
You need to upload a passport-size photo and scans/images of both sides of valid Nepali ID proof like citizenship, passport etc. -
How long does eSewa verification take?
eSewa KYC verification takes a maximum 48 hours. Status can be checked in My Information section. -
My verification got rejected. What should I do?
If your documents have any issues, verification gets rejected. Carefully read the clarification, correct errors in details/ documents, and re-submit the KYC application.
Read Also: